Afraid of baking bread? Believe me, you can bake bread. In fact, stop reading this right now, go stand in front of a mirror and look yourself straight in the eye. Take a deep breath, then say out loud, ‘I can bake bread!‘
Then come back and read this blog, so I can tell you how.
Not only are you going to bake the easiest, no-knead bread in the world, my friend, it might just turn out to be the finest bread you’ve ever had.
All sorts of mystique surrounds baking bread: understandably so, because yeast is a live and therefore fickle thing. Flour quality can vary considerably too – from region to region, season to season and even among different brand names. Add to that the effort involved in kneading and proving, and all that can go awry there, and it’s quite easy to see why many people get the jitters about baking something so simple and delicious.
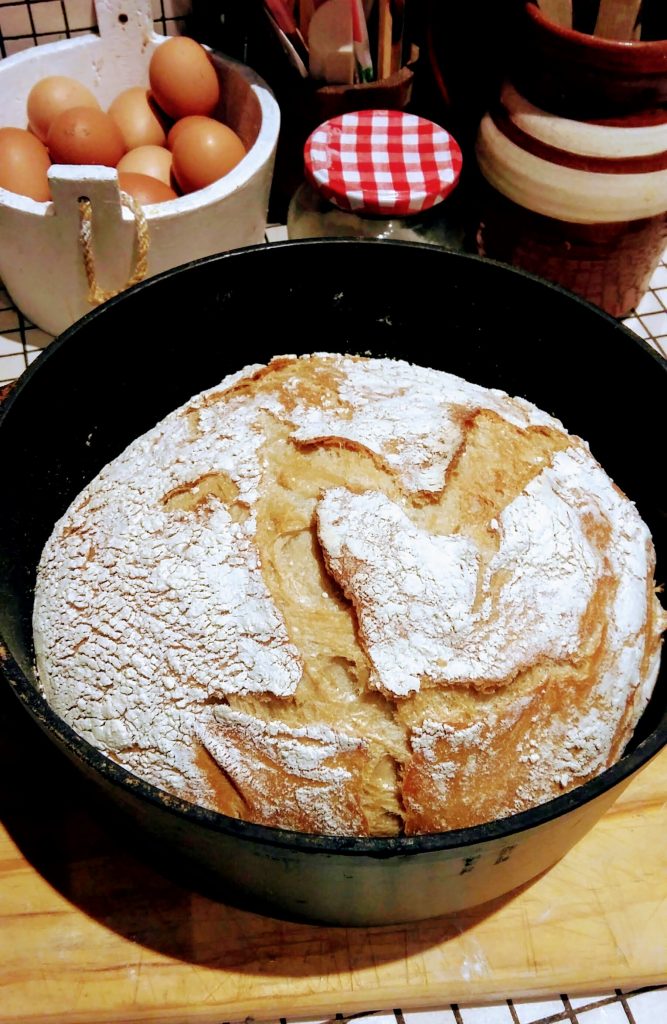
Enter New York baker Jim Lahey’s famous no-knead crusty bread, baked in a cast iron pot. This legendary loaf has become world famous on the internet and in home kitchens everywhere, but I first read about it in our local Platteland magazine.
It’s almost imposible to mess up (if you follow the simple instructions) and there is no kneading, no guesswork and no trickiness involved. You stir together your ingredients, leave it for 12 hours, slap the dough around a bit, leave for another hour or two, bake, and VOILA! Amazing bread. So simple, anyone can make it. Yes, even you.
Cook’s Note: Someone on Facebook asked if it’s not prohibitively expensive to have your oven on high for almost two hours just to bake a bread. I calculated the cost using Kestrel’s and Eskom’s websites, and at current cost, electriticity for this bread will be between R8.00 and R14.00 Considering the loaf is almost 2 and a half times the size of your usual artisan loaf, retailing between R25 and R65, I can safely tell you: Bake this bread 🙂
Intrigued, I immediately set about stirring together the dough as instructed, setting it aside in our scullery for the requisite 12 hours, and promptly forgot about it for the next 18 hours. But because I’m a daredevil in the kitchen (yeah, right), I took a gung-ho attitude about my memory lapse and simply decided to carry on with the recipe regardless, as if those extra 6 hours had never happened. Because no-one was watching, OK?
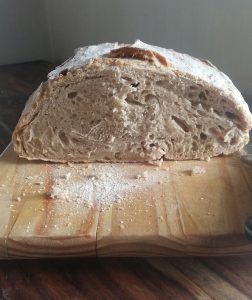
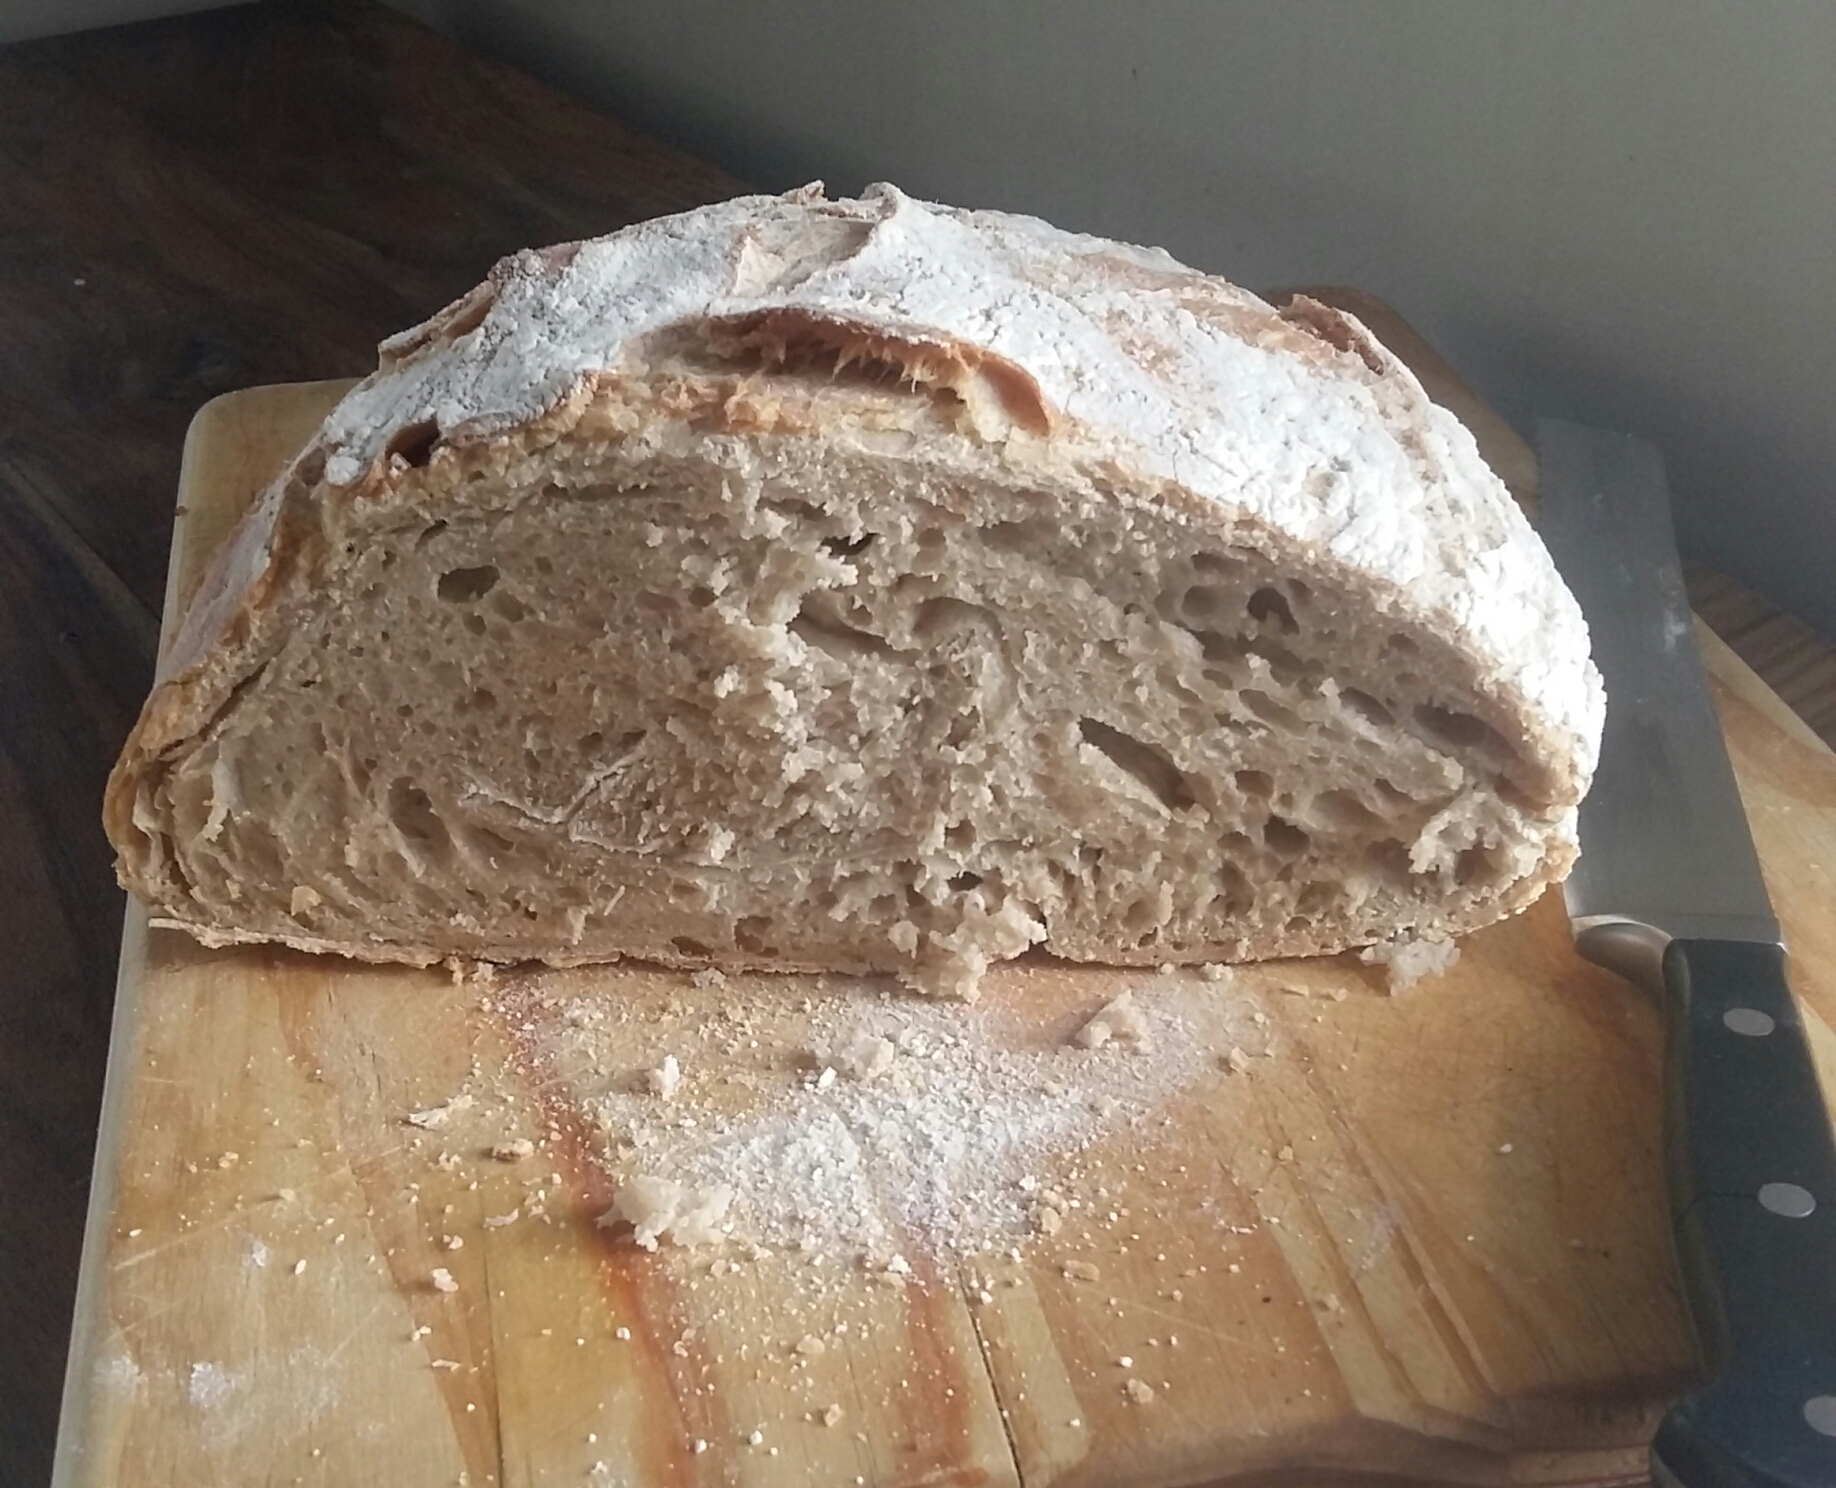
Much to my surprise, the loaf was a cracker and turned out perfect. It was so delicious that my family demolished it in about 4 hours flat, and it’s a pretty big loaf, I tell ya. The long, looong fermenting time develops a wonderful flavour in the dough, yielding a loaf so tasty and satisfying you just cannot stop yourself from having yet another slice. And another. This is the bread of your dreams.
The crust is wonderfully crisp and crunchy to chew and the texture like that of a real sourdough. Great when first out of the oven, it matures overnight to deliver an even tastier slice the next day. Equally good with sweet or savoury toppings,whether slathered in butter or drizzled with olive oil, this bread also makes divine toast and for French toast there’s nothing better. It freezes like a champ for up to a month, although I doubt you’ll have much left over for that. And if you do make more than you need, why not hew off a hunk and give it as a foodie gift to a friend or loved one? (Nicely wrapped, of course.)
No special equipment is needed to get started, provided you have a cast iron pot with a lid. (Or borrow one, with the promise of freshly baked bread.) Yes, your black flat-bottomed braai pot will do perfectly, or even your Le Creuset if you happen to have one lying around haha. (I use the local, much more affordable version of Le Creuset, the Eetrite brand – every bit as gorgeous and servicable. And after 14 years of heavy use, my three beloved blue Eetrite cast-iron enamelled pots are still going strong, thank you very much.) Other than that, you need white bread flour (preferably organic and stoneground), salt, instant or fresh yeast, and water. Oh yes, and an oven too, but you knew that already, didn’t you?
Precious little labour is required from you other than stirring together some flour, yeast, salt and a bit of water in a large bowl, and letting nature take its course for the next 12 to 18 hours. Yep, you read that right: you stir together the ingredients in a bowl, cover it and leave it completely alone for the next 12-18 hours. You have a life that needs you, don’t you? Go live it.
I use a large round metal mixing bowl and cover it with clingfilm and a clean bath towel after mixing the dough. It’s not a great idea to leave your dough in a drafty area nor one with big shifts in temperature – like near your tumble dryer or oven. Yeast is temperature sensitive, and sudden drops or surges in humidity and temperature will kill it. Stone dead. Boo hoo.
NB: if using fresh compressed baker’s yeast, make sure it is at room temperature before adding it to the 100ml warm water.
NO-KNEAD CRUSTY BREAD BAKED IN A CAST IRON POT
Ingredients:
3 cups stone-ground white bread flour (Eureka is a great brand)
1 – 2 teaspoons (5 – 10 ml) fine sea salt (I use 2 teaspoons)
30-40 grams fresh yeast, crumbled into 100 ml tepid water (not too hot, not too cool) in which you’ve dissolved 1 teaspoon sugar (5ml) or honey/OR 10 g instant yeast, added directly to the flour and salt before adding water. If using dried instant yeast, dissolve the tsp sugar/honey in the tap water before adding to the flour, salt and dried yeast powder. (I get fresh yeast from my local 7-11. Who’d have thunk?)
450 ml – 700 ml cool tap water, depending how much is needed to stir the flour, salt and yeast into a stiff but not dry or crumbly dough.
Method:
- Use a wire whisk to mix the salt with the flour in the bowl. If using instant yeast, add it directly to the flour and blend in with the whisk. If using the fresh yeast (which I prefer), crumble it into the tepid water and let stand for about 15 minutes to sponge – when it starts forming tiny bubbles or foam on the surface. Add this directly to the flour before adding the water.
- Now add the water slowly to the flour. I have used anything between 450 ml and up to 1 litre of water at different times of the year, with different kinds of flour. You DON’T want to end up with sticky wet dough though, so rather work slowly and cautiously with adding the water. Your dough is moist enough when no crumbly bits of flour are left in the bowl, and if the dough rolls itself into a ball as you stir it with a wooden spoon. You will notice at this stage that it seems as if the dough contains a live energy, and your are entirely correct, especially if you have used live yeast.
- Place the dough in a large bowl – remember the dough will quadruple in volume during the next 12 hours, so choose your bowl wisely! Cover tightly with clingfilm and then drape a clean, dry bath towel over the bowl. Leave in a cool spot to stand for 12 hours (I have let it go on for 18 hours to no harm.)
- 12 hours after mixing, your dough will resemble something out of a science fiction film: a pale grey, sticky, gelatinous sludge that bubbles slightly on the surface. It’s alive baby, it’s alive! You’ll be able to smell a pleasantly yeasty aroma if you hold your face close to the dough and breathe in. Lightly strew a scant handful of flour on a clean, dry worktop, and tip the contents of the bowl onto it. You’ll have to rake the sticky dough out with your fingers – a somewhat messy but not entirely unpleasant enterprise; kinda like being back in kindergarten. Using both palms straightened out, briskly pat your lump of quivering dough into a rectangular shape without working it too much – this should take you no more than 20-30 seconds – and to a thickness of about 3 cm. Fold first the right flap then the left flap centrewards, overlapping each other. Turn the dough 90 degrees in any direction and repeat the folding. Pat the dough into a ball shape.
- Now lightly flour a wide, long strip of baking paper – long enough to fold generously around the ball of dough – and lightly dust it with more flour. Place the ball of dough, seam side down, on one part of the paper, dust lightly with more flour, then fold the rest of the paper over the top of the dough. Cover with a clean, dry tea towel so no bits of the dough are exposed, and let stand for another 1- 2 hours in a cool, draft-free spot.
- Meanwhile, turn your oven as high as it will go – 220, 230 C is good. When it has reached this temperature, place your clean, dry, cast iron pot with its lid on inside the oven for at least one hour.
- NOW YOU ARE GOING TO BAKE BREAD! Use your oven gloves to remove the heated cast iron pot from the oven – remember to shut the door again as fast as you can! Take the lid off, remove the tea towel from the dough and use the paper to lift and roll the dough into the pot. Immediately replace the lid and return the pot to the oven for 45 minutes, using oven gloves. That pot is still hot! Remove the lid after 45 minutes for the crust to brown.
- Once the bread is done, (usually after about an hour) it will sound hollow if you rap the base with your knuckles. Yes, you’ll have to shake the bread out of the pot to be able to do this. If it doesn’t sound hollow, it’s not done, no matter what it looks like on the outside. Simply replace the lid and return bread in the pot to the oven for another 15 minutes and test again.
- When done, remove pot from oven and replace the lid, letting the bread steam for 20 – 30 minutes to soften the crust. Take bread out and let cool completely on a wire rack.
Congratulations, you’re officially a genius. You have made brilliant bread.